


- Getting Started
- Learning Center
- How Do I?
- Online Help
- Manuals
- FAQs
- Video Training
- PhonePad Trial Lessons
- Articles
- Phone Message Pads
- Logging Phone Calls
- What is PhonePad?
- Digital Phone Message Pad
- Replace Paper Phone Message Pads
- How Receptionist Take Phone Messages
- Phone Message Software FAQ
- Phone Message Templates
- How to Take a Phone Message
- Receptionist Phone Message Etiquette
- Receptionist Tools
- Phone Message Systems for Law Firms
- Managing Phone Messages in Medical Offices
- Phone Message Example
- Phone Message Management


MessageSender 6
Setting Up MessageSender 6

Products
PhonePad
•
Overview
•
Features
•
Why You Need PhonePad
•
Pricing
•
Licensing PhonePad
•
Upgrading from PhonePad 4
MessageSender
•
Licensing MessageSender
•
Setting Up MessageSender
Appointment Calendar


Once you have MessageSender installed, there is some setting up you will need to do. Don’t worry, it’s not difficult.
Step 1: Make Sure the MessageSender Service is Running
1. On your Server or Host PC, locate the PhonePad 5 Server folder on your desktop.
Copyright © 1995 - 2025 Cybercom Software. All rights reserved. Family Owned Business since 1995.
Cybercom Systems International Pty Ltd, trading as Cybercom Software.
5.
Check the Process Emails checkbox if you will be auto-forwarding messages by email.
6.
Check the Process SMS checkbox if you will be auto-forwarding messages by SMS.
7.
Check the Process Pushover checkbox if you will be auto-forwarding messages by Pushover.
8.
Select the Templates tab.
9.
If any of the template fields are blank then select a template from the drop-down list.
10.
Click OK to save your changes.
Step 3: Communication Settings
1.
Login to PhonePad as a System Administrator.
2.
Select the System Admin toolbar tab.
3.
Select Communication Settings.
4.
Follow the instructions for Email, SMS and/or Pushover.
Email - Using Your Mail Server
To set up Email sending, follow these steps:
1.
Select Email.
2.
Set the Active switch to ON.
3.
Select Mail Server.
4.
Select the Mail Server tab.
5.
Enter the name of your SMTP Server.
6.
Enter the SMTP Port that your mail server uses (or select a port from the drop-down list).
7.
Enter an Account Username. This will normally be in the form of an email address. It’s recommended that, if possible, you set up
an email account just for PhonePad.
8.
Enter the Account Password.
9.
Enter the same password again under Confirm Password. If they don’t match then the Confirm Password field will be highlighted
in red.
10.
Enter a Sender Name, or use the default “PhonePad”.
11.
The Sender Email should normally match the Account Username. If you enter a different address your mail server may reject the
emails.
12.
Select the Authentication tab.
13.
Make sure the EHLO checkbox is checked.
14.
Check the SSL Connection checkbox if you will be using a secure connection.
15.
Click the Apply button.
SMS
To use SMS sending, you will need to subscribe to a 3rd party SMS service. MessageSender currently supports SMS Global and
Clickatel.
To set up SMS sending, follow these steps:
1.
Select SMS.
2.
Check the Active checkbox.
3.
Select the SMS Provider from the drop-down list.
4.
Enter the account details provided by your SMS Provider.
5.
You shouldn’t need to touch the Gateway URL setting.
6.
Click the Apply button to save your changes.
7.
You can test the settings by clicking the Test button.
Email setup should now be complete. You can test the settings by selecting the Test Email Settings tab and sending a test email.
If you don’t receive a test email in your mail software then you may need to experiment with the Authentication settings to
determine the correct settings for your mail server.
Pushover
To set up Pushover sending, follow these steps:
1.
Select Pushover.
2.
Check the Active checkbox.
3.
If you don’t have a free account with Pushover, click the Pushover link on the screen to go to their website.
4.
Enter the User Key.
5.
Enter the Application Key.
6.
Click the Apply button to save your changes.
7.
You can test the settings by clicking the Test button.
Step 4: Automatic Message Forwarding
The final step is to set up Automatic Message Forwarding. This is done on a per-user basis. To set up your own Automatic Message
Forwarding, follow these steps:

That’s it. You’re all done.
This is also covered in the online help, PDF manuals and help files downloaded with PhonePad:
•
https://www.cybercom-software.com/help/phonepad5/admin/index.html?automatic_message_forwarding.htm
•
https://www.cybercom-software.com/help/phonepad5/admin/index.html?communication_settings.htm
•
https://www.cybercom-software.com/help/phonepad5/user/index.html?automatic_message_forwarding.htm


2.
Open the PhonePad 5 Server folder. Alternatively, go to this folder: C:\PhonePad5Server
3.
The first icon should be ControlCenter. Open ControlCenter.
4.
Make sure the MessageSender service is running.
Step 2: MessageSender Settings
1.
Login to PhonePad as a System Administrator.
2.
Select the System Admin toolbar.
3.
Click the MessageSender Settings button.
4.
Set the Active switch to ON.

5.
If the service is not running, select MessageSender and click the Start button.
Each of the screens are very similar. Just follow the instructions for each option and click OK to save your settings.
1.
Select the Settings toolbar tab.
2.
Click the Automatic Message Forwarding button.
3.
For forwarding to email, select Forward via Email.
4.
For forwarding to SMS, select Forward to SMS.
5.
For forwarding to Pushover, select Forward to Pushover.
Check Your MessageSender Settings
It’s quite possible you may have missed a setting or two while setting up MessageSender. To check that every has been set up
correctly, you can run a program called MessageSender Check.
It will go though all of your settings, looking for anything that may have been missed or not configured correctly.
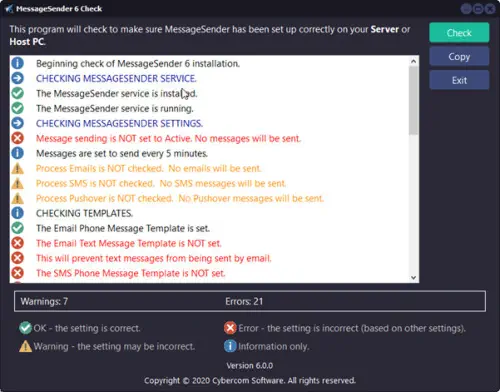
More information, as well as a download link, can be found in this blog article.


Email - PhonePad 5 CloudMail
Configuring your mail server settings can sometimes be difficult, especially when trying to determine the authentication
requirements. An alternative is to use PhonePad 5 CloudMail, a free email service provided for PhonePad 5 users.

1.
Select Email.
2.
Set the Active switch to ON.
3.
Select PhonePad 5 CloudMail.
4.
Select the CloudMail tab.

5.
Enter an email address in the Reply to Email field.
6.
Click the Create CloudMail Account.
7.
You can test these settings by clicking the Send Test Email button.
8.
Click the OK button to save your settings.


PhonePad 5
Setting Up MessageSender 6

Once you have MessageSender installed, there is some setting
up you will need to do. Don’t worry, it’s not difficult.
Step 1: MessageSender Settings
1.
Open ControlCenter.
2.
Select MessageSender.
3.
Click the Settings button.
4.
Check the Active check box.
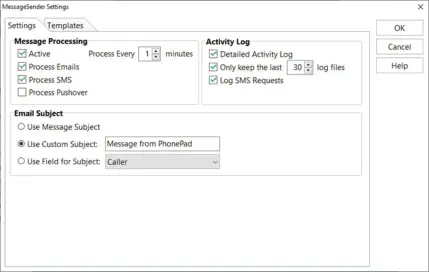
5.
Check the Process Emails checkbox if you will be auto-
forwarding messages by email.
6.
Check the Process SMS checkbox if you will be auto-
forwarding messages by SMS.
7.
Check the Process Pushover checkbox if you will be auto-
forwarding messages by Pushover.
8.
Select the Templates tab.

9.
If any of the template fields are blank then click the appropriate
button to recreate the templates.
10.
Click OK to save your changes.
Step 3: Communication Settings
1.
Login to PhonePad as a System Administrator.
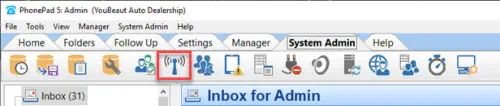
2.
Select the System Admin toolbar tab.
3.
Select Communication Settings.
4.
Follow the instructions for Email, SMS and/or Pushover.

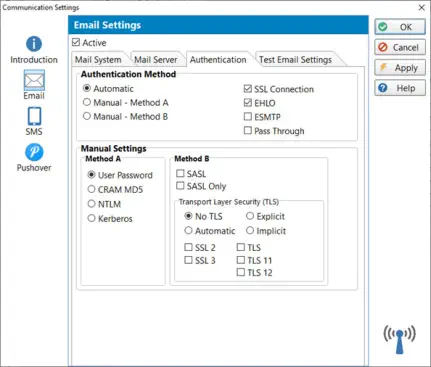
Email
To set up Email sending, follow these steps:
1.
Select Email.
2.
Check the Active checkbox.
3.
Select the Mail Server tab.
4.
Enter the name of your SMTP Server.
5.
Enter the SMTP Port that your mail server uses (or select
a port from the drop-down list).
6.
Enter an Account Username. This will normally be in the
form of an email address. It’s recommended that, if
possible, you set up an email account just for PhonePad.
7.
Enter the Account Password.
8.
Enter the same password again under Confirm
Password. If they don’t match then the Confirm
Password field will be highlighted in red.
9.
Enter a Sender Name, or use the default “PhonePad”.
10.
The Sender Email should normally match the Account
Username. If you enter a different address your mail
server may reject the emails.
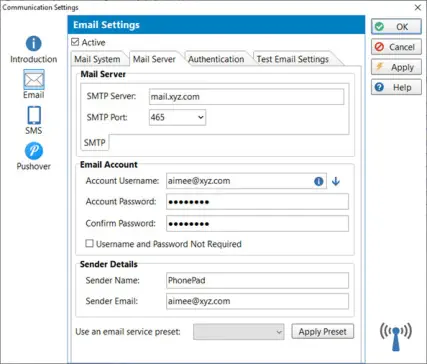
11.
Select the Authentication tab.
12.
Make sure the EHLO checkbox is checked.
13.
Check the SSL Connection checkbox if you will be using a
secure connection.
14.
Click the Apply button.
Email setup should now be complete. You can test the settings
by selecting the Test Email Settings tab and sending a test
email.
If you don’t receive a test email in your mail software then you
may need to experiment with the Authentication settings to
determine the correct settings for your mail server.
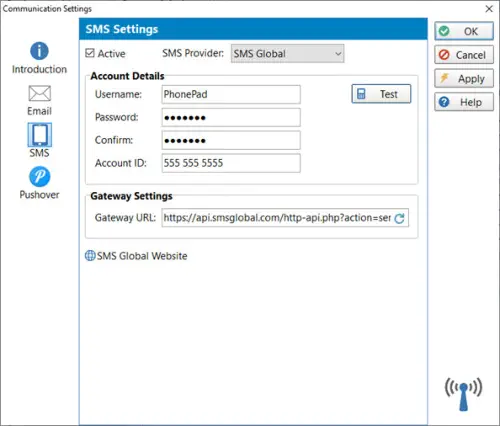
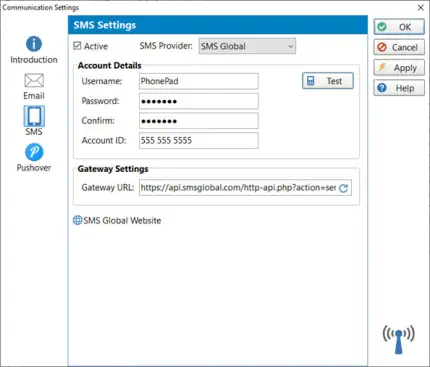
SMS
To use SMS sending, you will need to subscribe to a 3rd party
SMS service. MessageSender currently supports SMS Global
and Clickatel.
To set up SMS sending, follow these steps:
1.
Select SMS.
2.
Check the Active checkbox.
3.
Select the SMS Provider from the drop-down list.
4.
Enter the account details provided by your SMS Provider.
5.
You shouldn’t need to touch the Gateway URL setting.
6.
Click the Apply button to save your changes.
7.
You can test the settings by clicking the Test button.
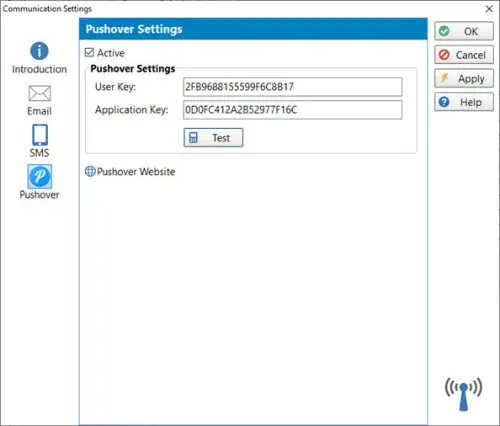
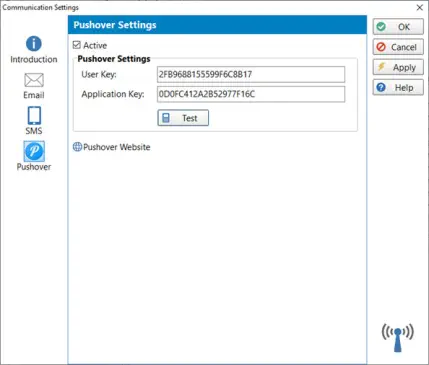
Pushover
To set up Pushover sending, follow these steps:
1.
Select Pushover.
2.
Check the Active checkbox.
3.
If you don’t have a free account with Pushover, click the
Pushover link on the screen to go to their website.
4.
Enter the User Key.
5.
Enter the Application Key.
6.
Click the Apply button to save your changes.
7.
You can test the settings by clicking the Test button.
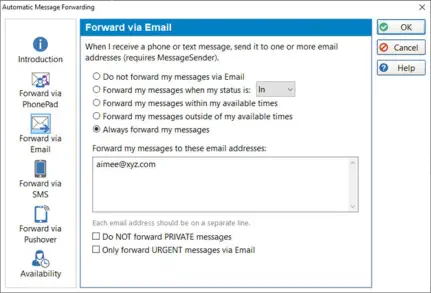
Step 3: Automatic Message Forwarding
The final step is to set up Automatic Message Forwarding. This
is done on a per-user basis. To set up your own Automatic
Message Forwarding, follow these steps:
1.
Select the Settings toolbar tab.
2.
Click the Automatic Message Forwarding button.
3.
For forwarding to email, select Forward via Email.
4.
For forwarding to SMS, select Forward to SMS.
5.
For forwarding to Pushover, select Forward to Pushover.
6.
Each of the screens are very similar. Just follow the
instructions for each option and click OK to save your
settings.
That’s it. You’re all done.
This is also covered in the online help, PDF manuals and help
files downloaded with PhonePad:
•
https://www.cybercom-
software.com/help/phonepad5/admin/index.html?automati
c_message_forwarding.htm
•
https://www.cybercom-
software.com/help/phonepad5/admin/index.html?communi
cation_settings.htm
•
https://www.cybercom-
software.com/help/phonepad5/user/index.html?automatic_
message_forwarding.htm
Products
PhonePad
•
Overview
•
Features
•
Why You Need PhonePad
•
Pricing
•
Licensing PhonePad
•
Upgrading from PhonePad 4
MessageSender
•
Licensing MessageSender
•
Setting Up MessageSender
Appointment Calendar
Copyright © 1995 - 2025 Cybercom Software. All rights reserved. Family Owned Business since 1995.
Cybercom Systems International Pty Ltd, trading as Cybercom Software.


