|
Adding a User |

|

|
|
|
Adding a User |
|
|
Adding a User
|
Adding a User |
|
|
|
|
Adding a User |
|
|
You will need to create a PhonePad login account for each person who intends using the system.
Click on the Add User button on the toolbar, or select Add User from the File menu.
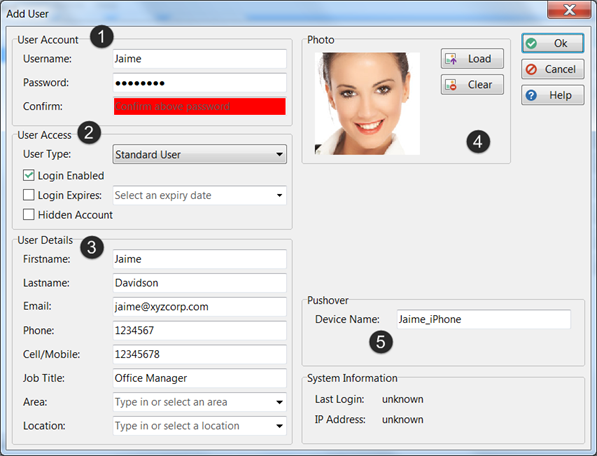
| 1. | Enter a Username. |
| 2. | Enter a Password for the user (they can change this themselves once they have logged in). |
| 3. | Enter the same password in the Confirm field. The reason for this is to confirm that you typed the password correctly. |
| 4. | If this person is going to be an administrator, check the Admin checkbox. Otherwise, leave it unchecked. |
| 5. | If this person is going to be an receptionist, check the Receptionist checkbox. Otherwise, leave it unchecked. |
| 6. | The Login Enabled should normally be checked unless you don't want the user logging in yet. |
| 7. | If you don't want the username to appear in user and recipient lists then check the Hidden checkbox. |
| 8. | If you don't want the user to be able to access the Address Book, uncheck the Address Book checkbox, otherwise leave it checked. |
| 9. | You can load a photo of the user by click the Load button and selecting an image file. Currently only Jpeg files are supported. |
| 10. | You can also enter extra details such as Position, Area, Location, Phone and Mobile/Cell. |
| 11. | Click the OK button to create the user login. |
Passwords
If PhonePad users are not logging in using a Username and Password (see Login Mode) then a password is not required.
Admin Checkbox
There are no special Administrator logins - any user can be an Administrator. To make a user an administrator just check the Admin Check Box.
Receptionist Checkbox
Normally, users can only check their own Inbox for messages. This means that they can only see messages that have been sent to them. A user can be defined as a Receptionist. This allows them to view the Inboxes of other users.
Login Enabled Checkbox
There may be times when you want to prevent a user from logging in. There are a number of reasons why you might do this:
| The person is on leave and you want to make sure no one can use their PhonePad login. |
| The person no longer works there but you cannot delete their user login because of referential integrity (see Deleting a User for more information). |
| Other security reasons. |
Hidden Checkbox
The Hidden check box allows you to hide usernames from the user and recipient lists that you use for addressing phone and text messages. If you don't want the username to appear in these lists then check this box. A typical use for this is receptionists or administrators. You may not need to send messages to receptionists or administrators. By hiding their usernames, users won't be able to select them as recipients for messages.
Address Book Checkbox
If you want to prevent a user from accessing the PhonePad Address Book, uncheck the Address Book checkbox.