|
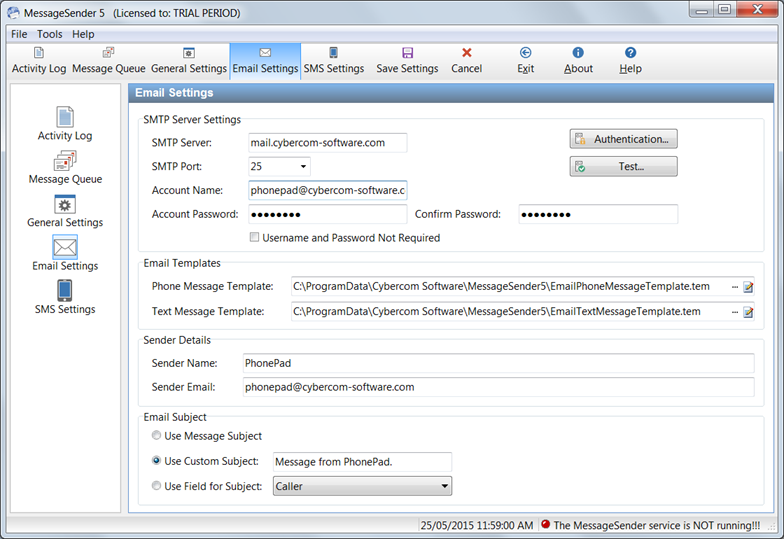
If you want to automatically forward messages via email, you will need to configure the following settings:
| 1. | Select Email Settings from the sidebar. |

| 2. | Under SMTP Server Settings, enter the details of your mail server. You will need to specify a valid email account (and password) to send the messages through. |
| 3. | If you are using an internal mail server then you may not need to provide a username and password. In this situation, check the Username and Password Not Required checkbox. |

| 4. | Under Email Templates, you will need to specify templates to use when sending the messages. You can either use the default templates or create your own (see Message Templates for more information). |
| 5. | Under Sender Details, you will need to enter the details of the email address you will be using to send the emails. Enter a Sender Name for the email account (eg. PhonePad, or whatever you want) and a valid email address for Sender Email. The email address you use should be the address for the account specified under SMTP Server Settings, otherwise you may get relay errors. You can simply click the green arrow button to copy the Account Name to the Sender Email setting if they are the same. |
| 6. | Under Email Subject, select what data should be used for the subject of the email: |
| • | Use Message Subject - The Subject field of the message will be used for the email's subject. |
| • | Use Custom Subject - The text you enter in this field will be used for the email's subject. |
| • | Use Field for Subject - Data from the selected field will be used for the email's subject. |
| 7. | If the default email authentication settings don't work with your mail server then you will need to click the Authentication button to change the settings. |
Important Note
Your email Account Name is typically your email address, eg. jane@somewhere.com. However, some mail servers require a slightly different formatting for the Account Name, by using a plus sign (+) instead of an at symbol (@). So for example, it would be jane+somewhere.com instead of jane@somewhere.com.
|


